
 In this post my intent is to show you the original tutorial that I used to build my 70 amp arc welder (pictured left). I built it myself using Microwave Oven Transformers. I intend to build another one this year and will use these instructions again. Since the original site, aaawelder.com is offline, I utilized the Wayback Machine to find the content and make it searchable again. No copyright infringement is intended or desired.
Please note that this machine can be a bit on the dangerous side. If you’re wanting to weld on the cheap, there are many other options. Amazon has this welder for far less than you’d expect. It gets great reviews, and it’s a much faster/easier way to get welding. I purchased on myself rather than build another welder! Click the pic below to get more details about it. Be sure to read the reviews!

![]()
I am a veteran welder/fitter with 20+ years developing and applying my skills. I have worked in fab shops from the corn fields of Illinois to the ship yards of the deep south pitting my skills against world class welder/fitters. I built a 70 amp arc welder from microwave oven transformers to handle my small welding jobs, a micro welder if you will.
I tried a store bought 110 volt welder but, I could not get the rod to fuse the joints. The rod would melt into little balls and just lay on the workpiece not fused at all. I won’t mention a brand name, let’s just say I was disappointed.
The experience of building my own welder was rewarding as well as enlightening. Few things compare to building something that actually works, a test of skill and fortitude in which you come out the victor. It doesn’t get better than that. At AAAWelder , I seek to inspire and awaken the artist in all, at AAAWelder I say, “Yes we Can”.
WARNING!!!!!! Proceed with the construction of this device at your own risk! If you are not sure of proper procedure and safety precautions, DO NOT BUILD! The energy produced by this unit can kill you if you allow it. Be smart. Be safe. Be aware!
How I Built My 70 Amp Arc Welder
Step 1: GET THE TRANSFORMERS
There are several ways to do this. The method I chose was to call the Dept. of Sanitation and ask them to set several microwaves aside. When I told them what the project was, I got a few laughs and an O.K. Two weeks later, I had 6 microwave ovens. The 110v arc welding machine requires 2 transformers.
Step 2: STRIPPING THE UNITS
A word of caution here concerning the transformers: take care when removing the connectors from the primary coil (see Fig. 1). Sometimes the only thing that holds the coil ends in place is a piece of tape. Pulling or jerking could rip them free causing breakage or stress fractures in the magnet wire. Take the time to do it right. Remove the transformer. There are other things I remove as well: the cooling fan (you need 1 for the 110v welding machine), the power cord, the magnets from the magnetron (to be used in another project), and the wiring harness (wire from the harness can be used to run power to the transformers, cooling fan and on/off switch).


Step 3: Modify The Transformers: Phase 1
This is the make or break phase of this process. How and what you do from this point on will determine the results of your efforts. Programmers use a term that says it all: GARBAGE IN, GARBAGE OUT! Take your time. Do it right. If you feel yourself getting angry or frustrated, stop, drop everything, go and get something cold, come back later.
The secondary coil in both transformers has to be removed. I will explain my way, you may have one better.

The tools I used to perform this step were a common hammer and a really sharp chisel. The width of the chisel was less than the width of the core slot. Clamp the transformer to a stationary object (table, bench, etc.) as shone in Fig. 2. Place the chisel at the start point of cut # 1 (Fig. 3). Cut through the coil by striking the chisel with the hammer until you reach the stop point, which should be completely through the thickness of the coil. Cut through any remaining strands left by your first cut. Remove the clamp. Turn the transformer 180 degrees and clamp (cut # 2 should be at the top now). Repeat the cuts at cut # 2 until that section of coil is free. Remove section (Fig. 3). If you cut into the primary coil, get another transformer, that one is history. Strap yourself in, now the real fun begins.

As you can see from fig. 4 and fig. 5, the remainder of the secondary coils must be completely removed, including the 3 turn filament winding. I solved this problem by finding a steel bar that could be driven into the core slots without jamming and have enough area on the face to push the coils out in one chunk instead of thousands of strands. Good luck!
Transformer Modification: Phase 2
If you enjoyed phase 1, keep your belt buckled, you’re going to love phase 2. This is where you get to rewind the secondary coils so that they will perform the way you want them to. The steps I describe in this phase are theory based on research and conclusions from my own experiments. I relate electron flow to that of water because they share the same characteristics. Everything you do to insure unimpeded current flow will get you the best performance from these transformers. With that in mind, let us proceed.
You need to determine, as best you can, the direction the primary coils are wound. Turn the transformers so that the connectors on the primaries are facing you. One will be going into the core (let’s call this the in put for sake of clarity) and, the other coming out (out put). The secondaries of both transformers will be wound with respect to their primary winding. This is an attempt to keep the transformers in phase with each other.
If you find that the primary is wound clockwise, simply reverse the procedure in Fig. 7.

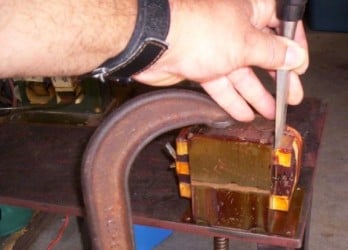
The first three rows should go smoothly. The forth may jerk some choice words out of you. I used a screwdriver with the spade taped over to pry gaps between the wire and the core. Your goal is 20 turns of #10 AWG stranded copper wire, insulated, 25 feet in length for each transformer. I reached 18 turns and my welder works fine. Once again, good luck!
By the time you’re done rewinding the secondary, you will have a new appreciation for the rewinders’ art. Your work may not be pretty at this stage but, I’ll bet they run like “scalded dogs”.

Step 4: Specs and Test
Soft-wire the transformers according to this simple schematic. You can hard-wire this unit after the arc welder is working properly.

Do not apply power to the circuit yet. Locate tag ends of the filament winding and cap, as much as 13 amps can spill out. Do not include yourself in this circuit; a blast through your heart can kill you. Think safety before you flip the switch. Tape the output wires to a non-conductive stationary object spaced a minimum of 4″ apart.


If you have followed the order of assembly, all that needs to be done here is to check the output voltage. With your voltmeter set to 50vac, turn the welder on, take a voltage reading, turn the welder off. If your lights are still on, you have passed the first test; no shorts. If the output read is not to specs, and reads approx. half, reverse wire the secondaries. If you hit the nail on the head, congratulations my friend, you now have a welding machine. Hard-wire your unit. No instruction for housing the unit is given here, that is a matter of choice, taste and individuality. I used the housing from an old radio transmitter I found at the dump. The housing from the microwaves can be cut and fashioned for this micro welder. The possibilities are endless.
Welding With The 70 Amp Arc Welder:
This welding machine burns the 1/16″ 6013 electrode with ease. The 3/32″ 6013 electrode burns slightly cold because I did not achieve the full 20 turns each. So strive to hit the target of 20/20. I lay down a hot shining bead with the 1/16″ 6013 electrode and if I want a built-up weld, I run a 2-cap with the 3/32″ 6013 electrode. For a more in-depth tutorial on welding with your new welder, check out some of the great welding books that are available.
Power:
Keep in mind that although this arc welder uses a 110vac source, this welding machine is cranking out some major amps. A 20 amp breaker may not be enough for continuous use. A 30 amp breaker would be better. It seems I can weld forever with the 1/16″ 6013 electrode, but the 3/32″ electrode causes trips when I weld too long. I hope this tutorial was instrumental in helping you to build a micro welder that can handle your welding jobs. I would like to hear about your success. If I overlooked something or did not clarify a point, I would like to hear about that too. If I can assist you at any step of the journey, please feel free to e-mail me.


10 comments
1 ping
Skip to comment form
I was wondering if the dial acted at a variac so you could plug this directly into the wall.
Author
Which dial are you referring to? The original instructions are not my own, but I don’t see anything about a dial. I did build my first welder using these instructions, and it was plugged directly into the wall.
Ive recently built one of these and I am just about done. Just gotta hook up the power. I was pondering on a couple of thoughts about the build and after reading this, I figure you’d be the person to ask. First is that I’d like to make sure how exactly it should be connected if using one 220v plug? And secondly, a more of a theoretical type question. I’ve seen articles explaining to use the original microwave wiring harnesses and plugs that would allow easier installation of the microwave fans for cooling. My question kind of takes that route a little further. if one was to reuse the microwave wiring harnesses and such, would it be possible to leave the microwave keypad with all the buttons and if the microwave has a function to change the power when in use, could that function be used to control the output power of the welder? I havent seen anything about that anywhere and it seems that consistent power management is one of the main challenges of these. Thinking about it, I think its theoretically possible, being that it seems that instead of connecting wire leads to the magnetron they are replaced by welding clamps from the rewired transformers, so I’m sure the power limiting function would occur before that point inside the stock wiring harness. Thoughts? Thank you for your time.
James
Author
Hey there James, I’m not sure about running it on 220. I’d imagine that the primaries would be ran in series rather than parallel, but I really do not know the answer. As for limiting the output by using the original controller board, I would say probably not. Those work by cycling the transformers on and off, and would not be suitable for welding I don’t think. Good luck with your project!
Please sir,I could not get a stranded 10 gauge copper wire, but what I could get was a tick 10mm wire and I used 4 microwave transformer and my winding to each transformer was 10 turns and one was 9 turns, and it work great with 3/32 electrode.my question is that I want to build one with a two transformer, which type of another wire can I use to replace the 10 guag wire ?so as to work great.
Author
Thanks for the comment! You might try two windings of 14 or 16ga wire instead. You can also use 10ga solid wire, it’s just harder to work with.
If I was to use 2 transformer cores welded together, could I use only 1 primary with 40 turns of wire? Or would I still need 2 primary coils??
Author
You still need two primaries and two secondary windings. There’s no advantage to combining the transformers. Thanks for the comment!
I’ve been using my 3 transformer welder for over a year without problems! I use a 3 transformer setup the same way as yours but wound with dryer cable, 6 gauge I think! Yes it was a Bas$%&d to wind but burns 3/32 6013’s like a charm! 9 turns each! Kept tripping the breaker so I made a 120v cable to run off the 220 dryer outlet using one live, neutral and ground! Works perfect! Now I’ve scrounged up 3 more larger transformers from over counter microwaves and am going to try getting at least 12 turns to hopefully run 1/8 7018’s! Excellent instructions by the way!
Author
Right on, glad it’s working well for you! I do have to say though the welder I linked there at the top. It’s so much better man. Especially for the price. I can burn 1/8″ rods on 120v! And it’s DC not AC so much cleaner welds too.
[…] The purpose of this is to document my build, not to show you how to build one. the best instructions were at a website that is now offline. I’ve mirrored them here, and they are originally by Randy Gross. […]